How to Clean Your Honda After a Mud Bog Without Damaging Electronics


When you ride deep mud, water holes, and thick clay, your Honda takes a beating — especially the sensitive electronics that keep it running smoothly. Cleaning your machine the wrong way can lead to misfires, corroded connectors, blown fuses, and expensive downtime. Cleaning it the right way? That’s how you keep your machine reliable season after season.
This guide walks you through the safest way to wash your Honda ATV or UTV after a mud bog without risking electrical damage, plus the tools and accessories that actually make the job easier.
Mud doesn’t just make your machine look rough — it works its way into every corner. Thick grit can:
Trap moisture around wiring harnesses
Pack into connectors and sensors
Stress bearings, bushings, and seals
Increase heat on the engine and drivetrain
Hide developing problems you won’t notice until it’s too late
A clean Honda is a reliable Honda, especially once you start adding accessories, snorkels, and electrical upgrades.

Never spray a hot engine or exhaust with cold water. Rapid temperature changes can crack plastics, warp metal parts, and cause condensation inside electrical components.
Let your Honda cool for at least 15–30 minutes before washing.

A lot of riders make the mistake of blasting the machine with a high-pressure washer right away. High pressure forces water into:
ECU housings
Injector connectors
Handlebar switch housings
Brake light and taillight plugs
Snorkel joints
Start with a gentle hose rinse to loosen surface mud without driving water into sensitive areas.
Avoid directly spraying:
✔ The ignition switch
✔ Gauge cluster
✔ ECU box
✔ Battery area
✔ Handlebar switches
✔ Any aftermarket lights or splices

Once the loose mud is rinsed off, apply a cleaner designed for off-road machines. Let it soak for a few minutes so it breaks down thick grime packed around:
Footwells
Skid plates
Radiator area
A-arms and suspension
Rear differential
Winch housing
Scrub gently with a soft brush to avoid scratching plastics.

Now is the time to use a pressure washer — but at a distance and with a wide fan tip. Keep the nozzle 2–3 feet from electrical areas and avoid directly targeting connectors.
Focus on areas that collect the most mud:
Undercarriage
Tire treads
Driveline + U-joints
Wheel wells
Radiator fins
Bumper and racks
Take your time. Mud hides everywhere.

This is a huge secret most riders never do — and it prevents more electrical problems than anything else on this list.
Use compressed air (or a leaf blower if that’s all you have) to push water out of:
Connectors
Switch housings
Radiator fins
Crevices around the engine
Snorkel joints
Brake pedal pivots
Suspension bushings
Removing water before it dries prevents corrosion and intermittent electrical problems.

This is where most riders fail. After every deep mud ride, check your critical connectors.
Look at:
ECU connectors
Fuel injector plugs
Ignition switch harness
Headlight and taillight plugs
Winch terminals
Snorkel airbox sensors
Apply dielectric grease to any exposed terminals. This keeps out moisture and mud and ensures a clean, reliable connection.
If you need upgraded waterproof connector kits, this is where Vessel Powersports can offer real value.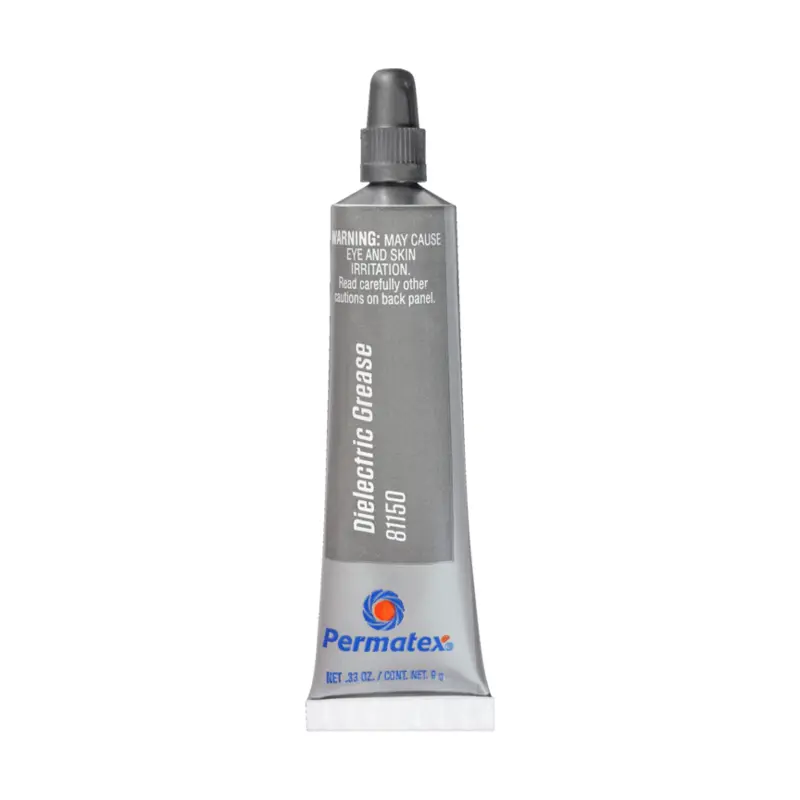
Mud and water love getting into the air intake, especially if you were riding anything deep.
Remove the air filter
Clean or replace it
Inspect snorkel boots and joints for leaks
Make sure clamps are tight after washing
A dirty or wet air filter is one of the top causes of post-ride issues.

Your radiator does more than cool your engine — it protects everything else from overheating.
Spray from the back side forward, using low pressure to avoid bending cooling fins. Mud caked on the radiator can cause your Honda to run hot for the rest of the season.

Give your Honda 20–30 minutes to air out before cranking it.
If you washed around the electrical system aggressively, wait a little longer. This prevents shorts, rough idling, and false sensor readings.

Once dry, you can apply a plastic restorer or protectant. This helps:
Repel future mud
Reduce sun fading
Keep plastics looking clean and glossy
Your machine will look ready for the next ride — and easier to wash next time.
❌ Never spray the ECU directly
❌ Never blast high pressure into your snorkel joints
❌ Never clean a hot engine
❌ Never use household dish soap on plastics
❌ Never forget to re-grease pivots and bearings after heavy mud exposure
These mistakes lead to expensive electrical failures and premature wear.
Cleaning your Honda the right way protects not only the plastics and paint — it protects your electrical system, which is the heart and brain of your machine. Whether you ride deep bounty holes or spend the weekend cruising trails, giving your machine a proper wash after every mud bog is the easiest way to keep it running strong.
If you want to make post-mud cleanup easier, check out the Honda-specific accessories, snorkel upgrades, and electrical protection solutions at VesselPowersports.com.
![]()
Factory headlights leave blind spots a...
Deep-water crossings ruin standard ATV...
Learn how a frame stiffener helps prot...
Take control from the left s...
Easily convert Honda 4x110 to Polaris ...
Item added to your wish List
Item added to your Compare List


